There are many ways you can spice up your stream and add a little more personality to it using OBS. And just one of those ways is by adding a scene transition to make your scenes flow together more seamlessly.
OBS can be quite complicated, especially if you are new to the program. So if you want to add a scene transition to your stream, but you’re not quite sure how, you’ve come to the right place.
What Is a Scene Transition in OBS?
A scene on OBS is used to describe each of your different display options. For example, if you have a camera-only display that shows a close-up of your webcam feed, that is called a scene. If you also have a display where your viewers can see your gameplay, that is another scene.
By default, OBS will rapidly cut to each of your different scenes when you flick between them. This is fine, and it gets straight to the point, but it is also quite abrupt for your viewers. By adding a scene transition, you can get OBS to fade into your next scene nicely, rather than just abruptly changing.
Adding a scene transition like a fade can make your transition from one display to another a far more seamless experience, but that is just the tip of the iceberg. There are plenty of options you can choose from. If you’re crafty enough, you can even create your own unique video transition called a stinger.
Adding scene transitions is definitely recommended to make your stream a more pleasant experience for your viewers, but visuals aren't everything. Coming up with your own unique Twitch channel point ideas is another great way to get your viewers involved in your stream.
How to Add a Scene Transition to Your Stream in OBS
Adding a standard scene transition to your stream in OBS is incredibly simple and will most likely only take you about a minute to complete. Choosing a scene transition that is already built into OBS is by far the easiest method. So if you're new to OBS, you may want to take this route to begin with. You can always update or change it later on if you change your mind.
To add a standard scene transition in OBS, follow the instructions below:
- Open your OBS software.
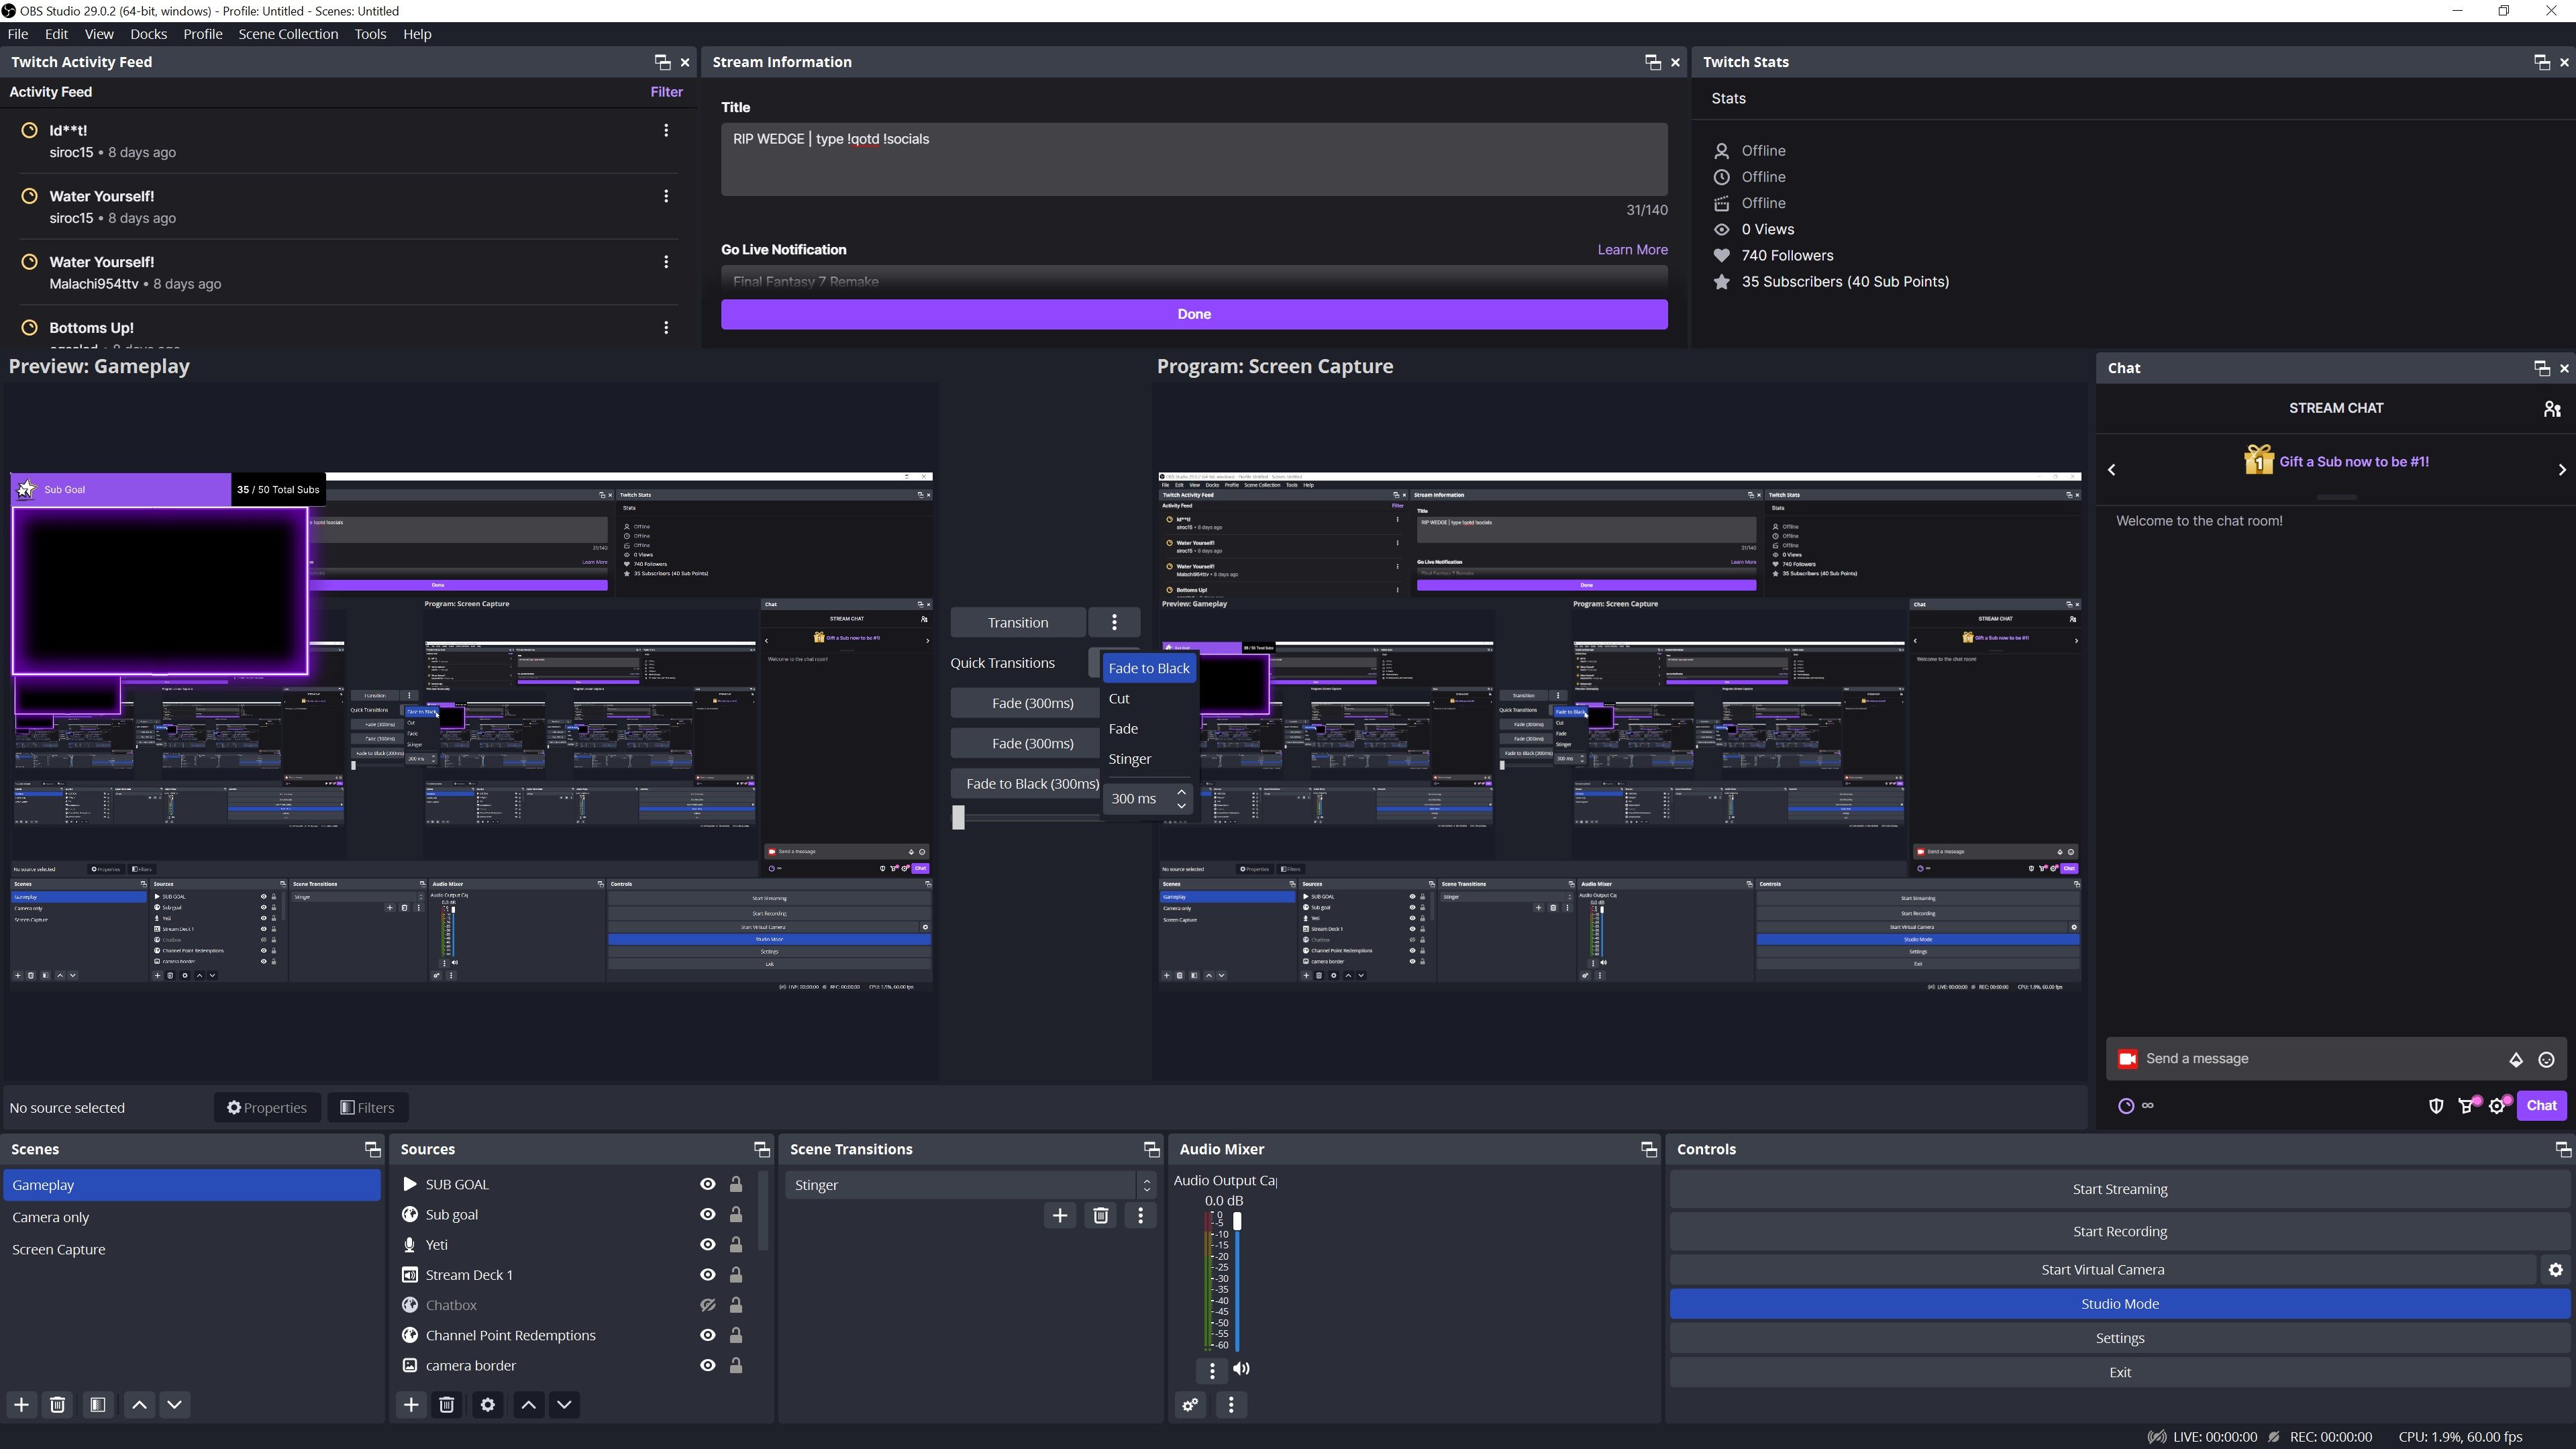
- In the middle of the screen between your Preview and Program displays, you will find your Transition options.
- Press the + button beside Quick Transitions.
- Select your preferred transition from the drop-down list.
Now the display will perform the action you selected whenever you transition to another scene while streaming.
How to Add a Stinger to Your Scene Transition in OBS
Fading between scenes is the easiest and most popular option, but there is another method you could use if you want to add more personality to your transitions. This involves adding a stinger.
A stinger is a short video, usually around two to five seconds long, that provides the transition for your scene. You could have a puff of smoke that goes from one side of the screen to the other or a fire that burns from one scene to the next. The options truly are endless.
To add a stinger as your scene transition, follow the instructions below:
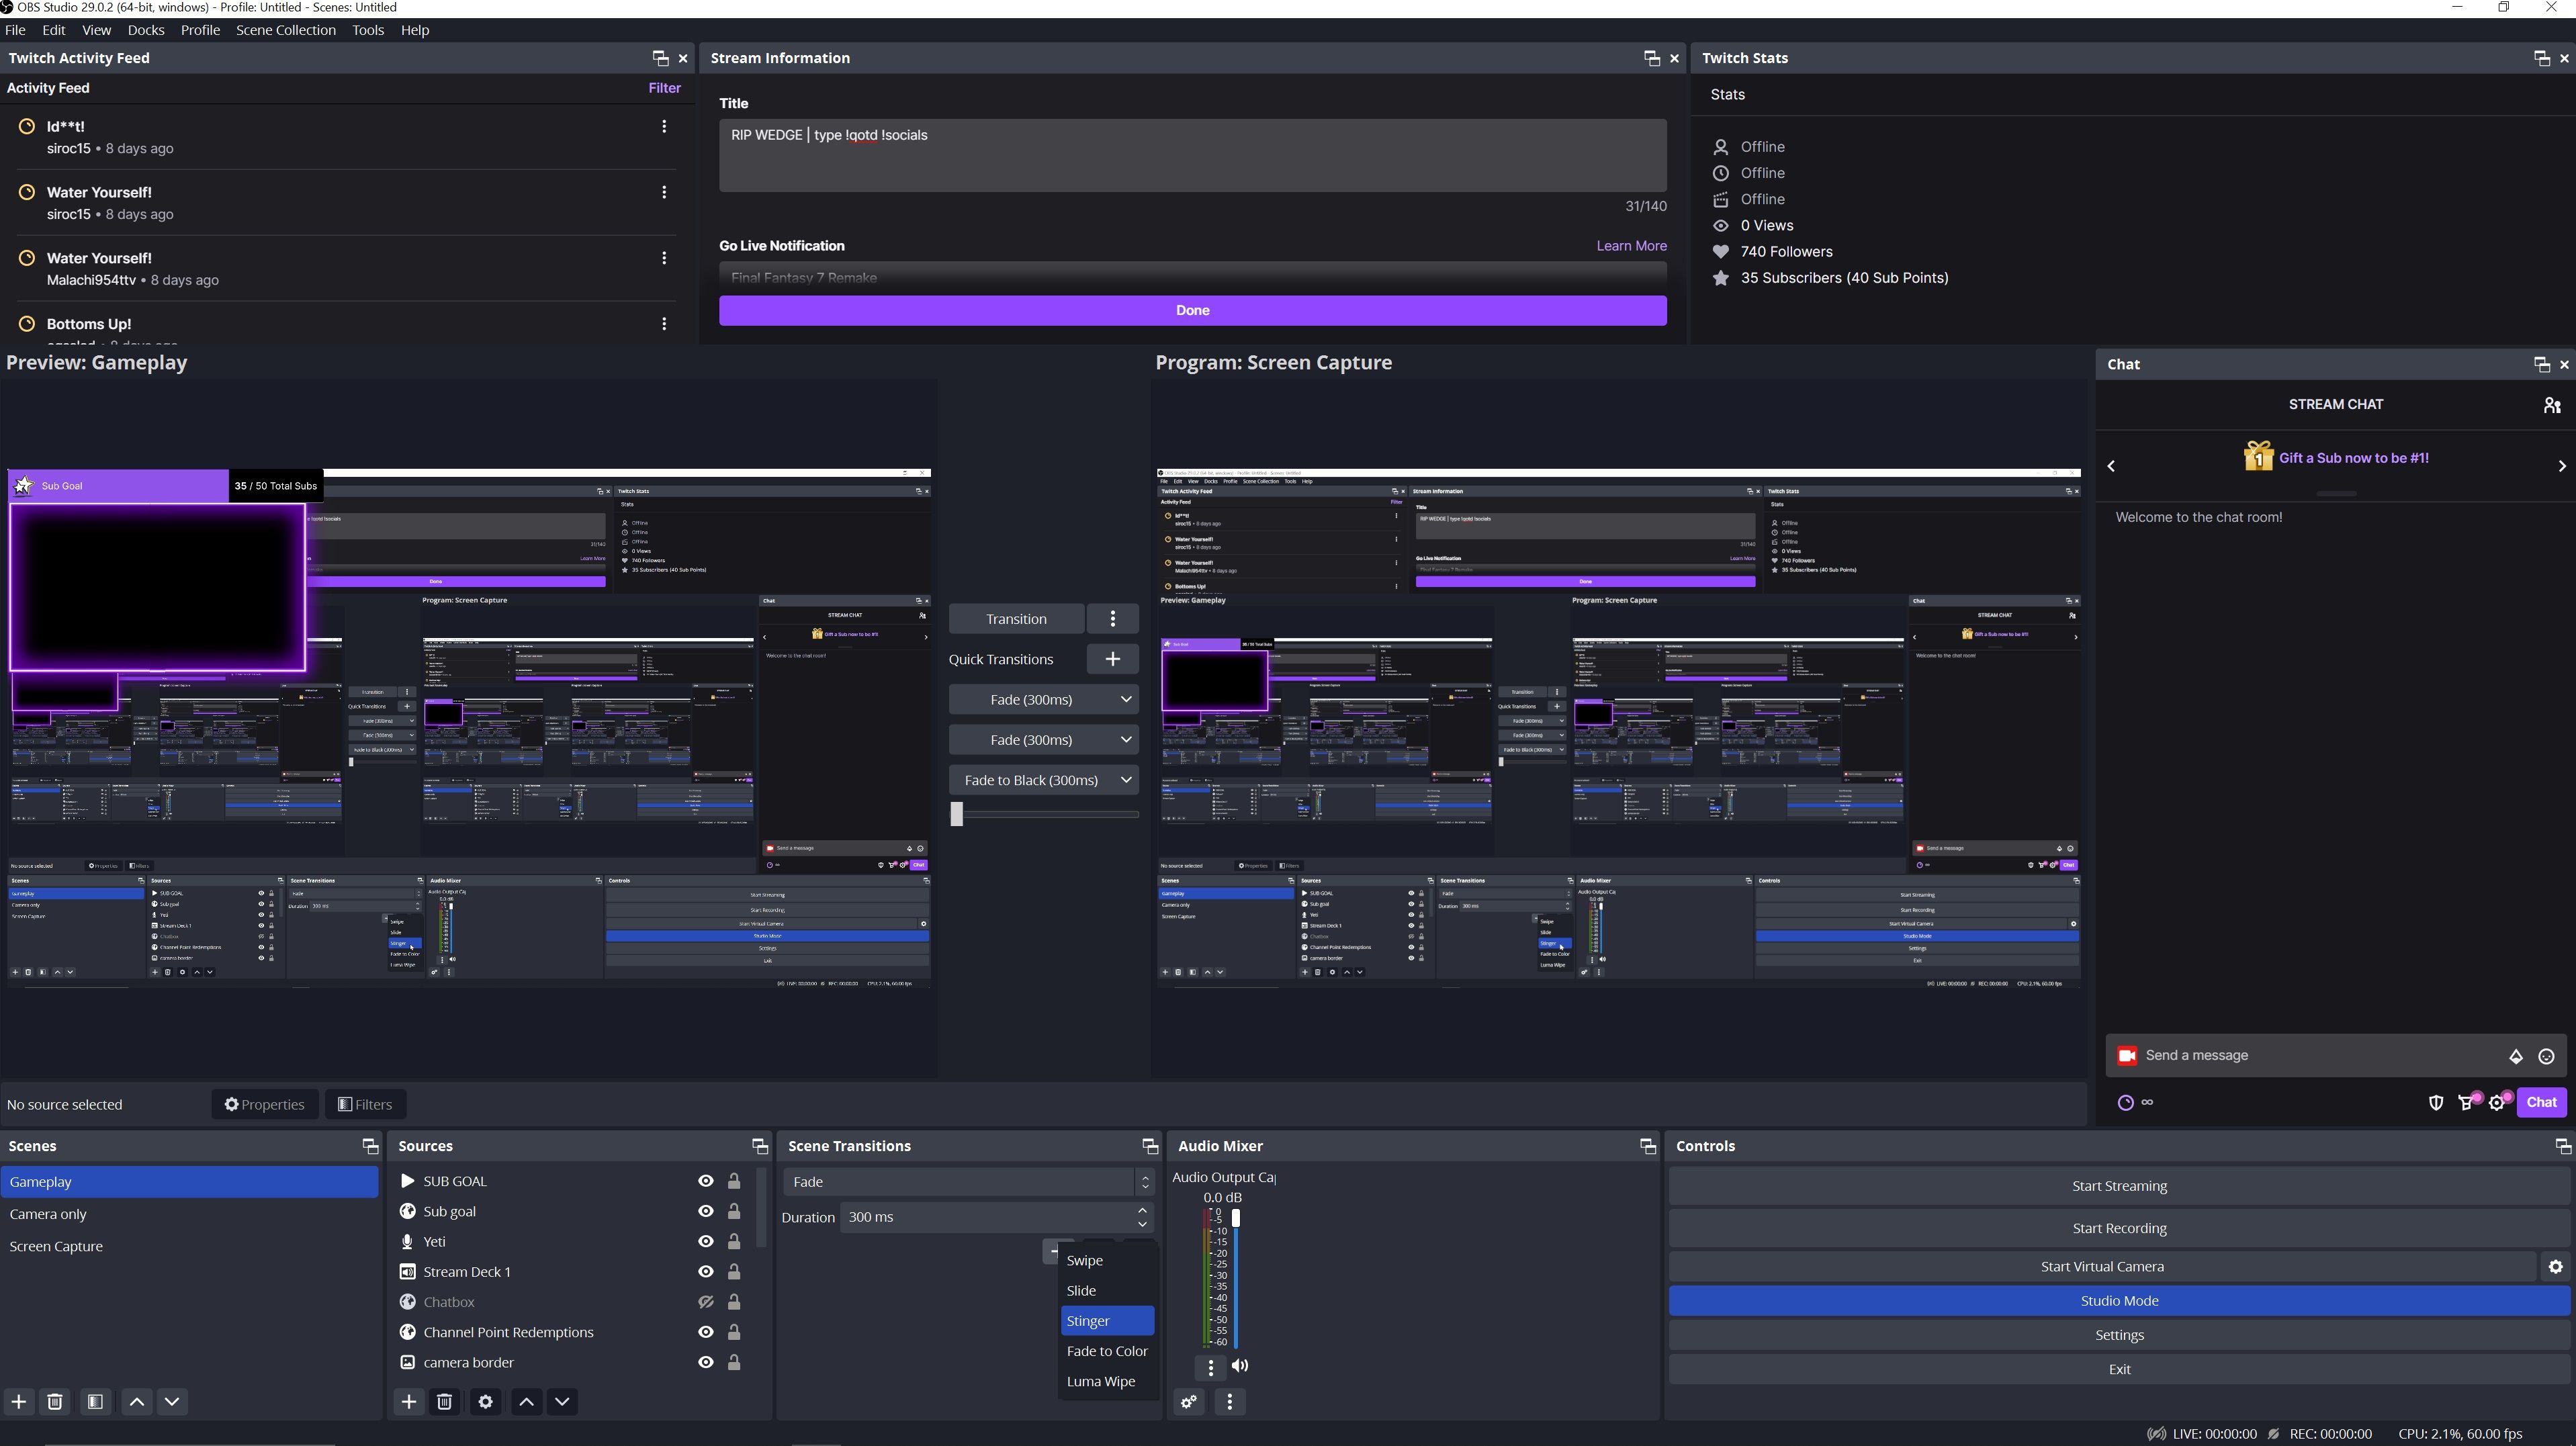
- Instead of operating in the Quick Transitions menu like before, scroll down to the Scene Transitions menu that runs along the bottom of the screen. It should be between your Audio Mixer and Sources menu depending on how you have your OBS set up.
- Press the + button underneath your current scene transition selection and select Stinger.
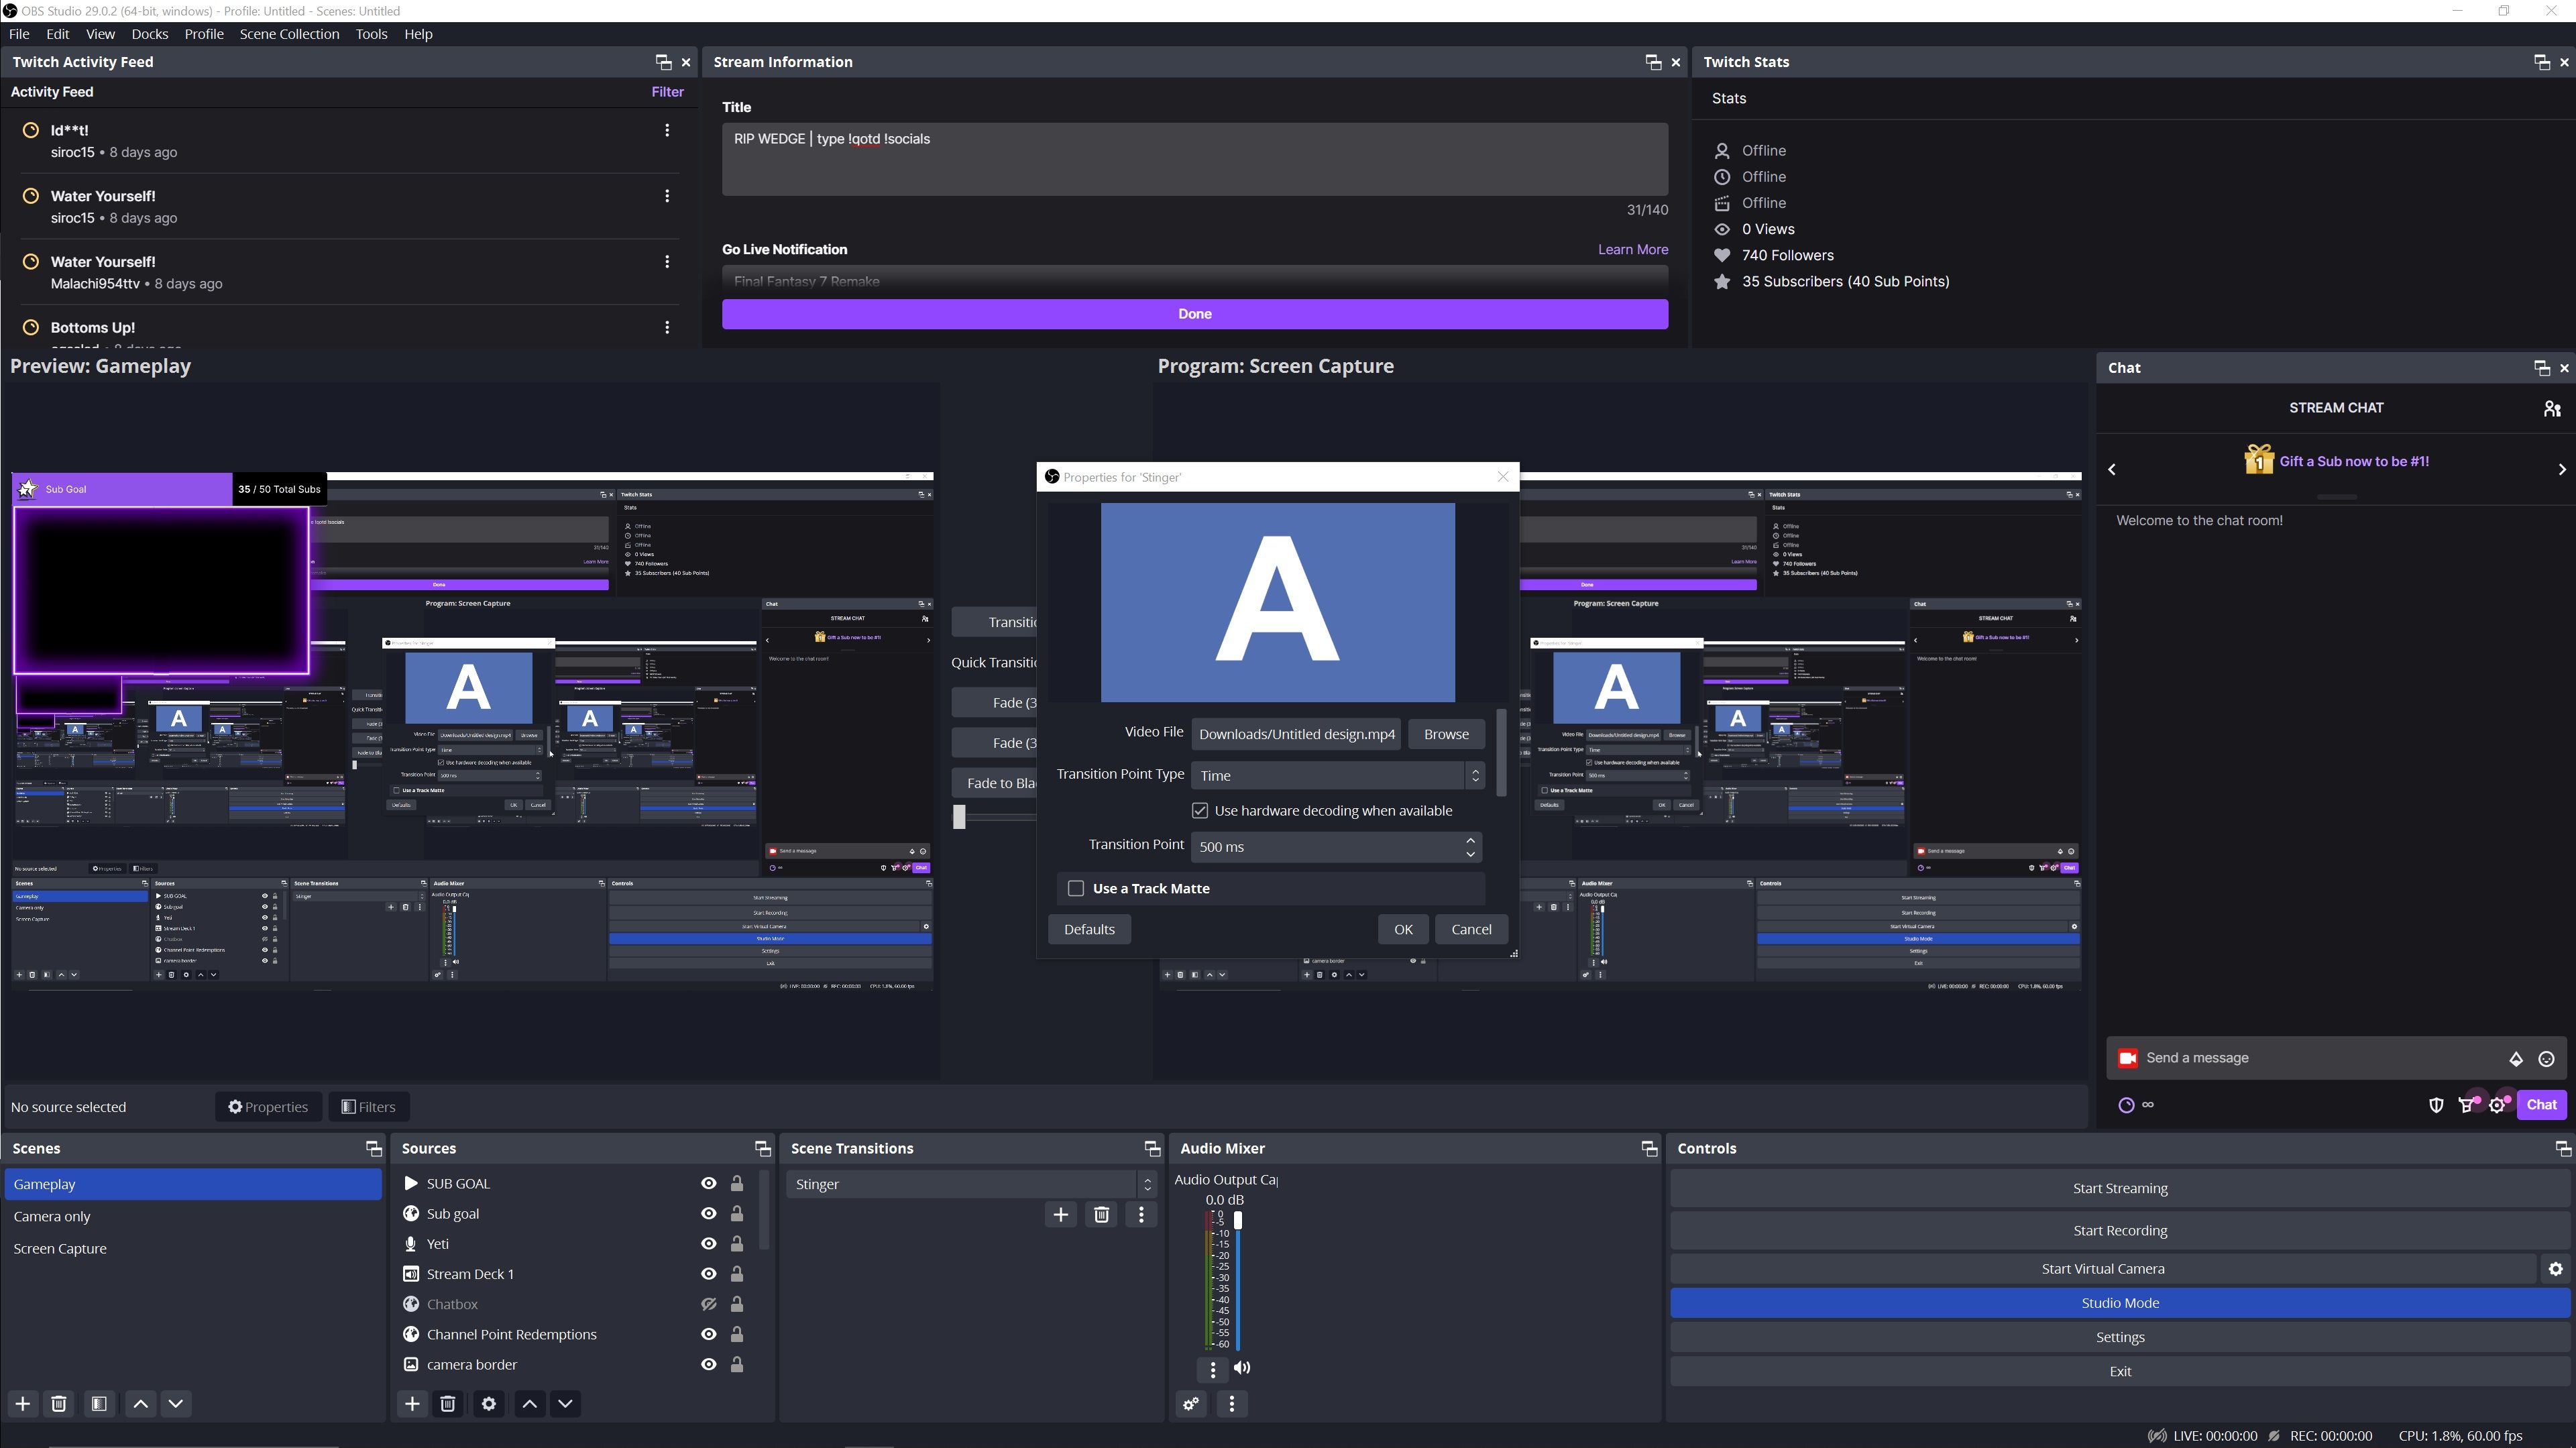
- Press Browse to find and select your video from your computer's files.
- Select Time as your Transition Type.
- The Transition Point is the exact time in which your scene will flick to the next one, so your selection will depend on your unique stinger. Preferably you would want to make your Transition Point occur at the moment where the entire screen is covered by your stinger, so your transition will be as seamless as possible.
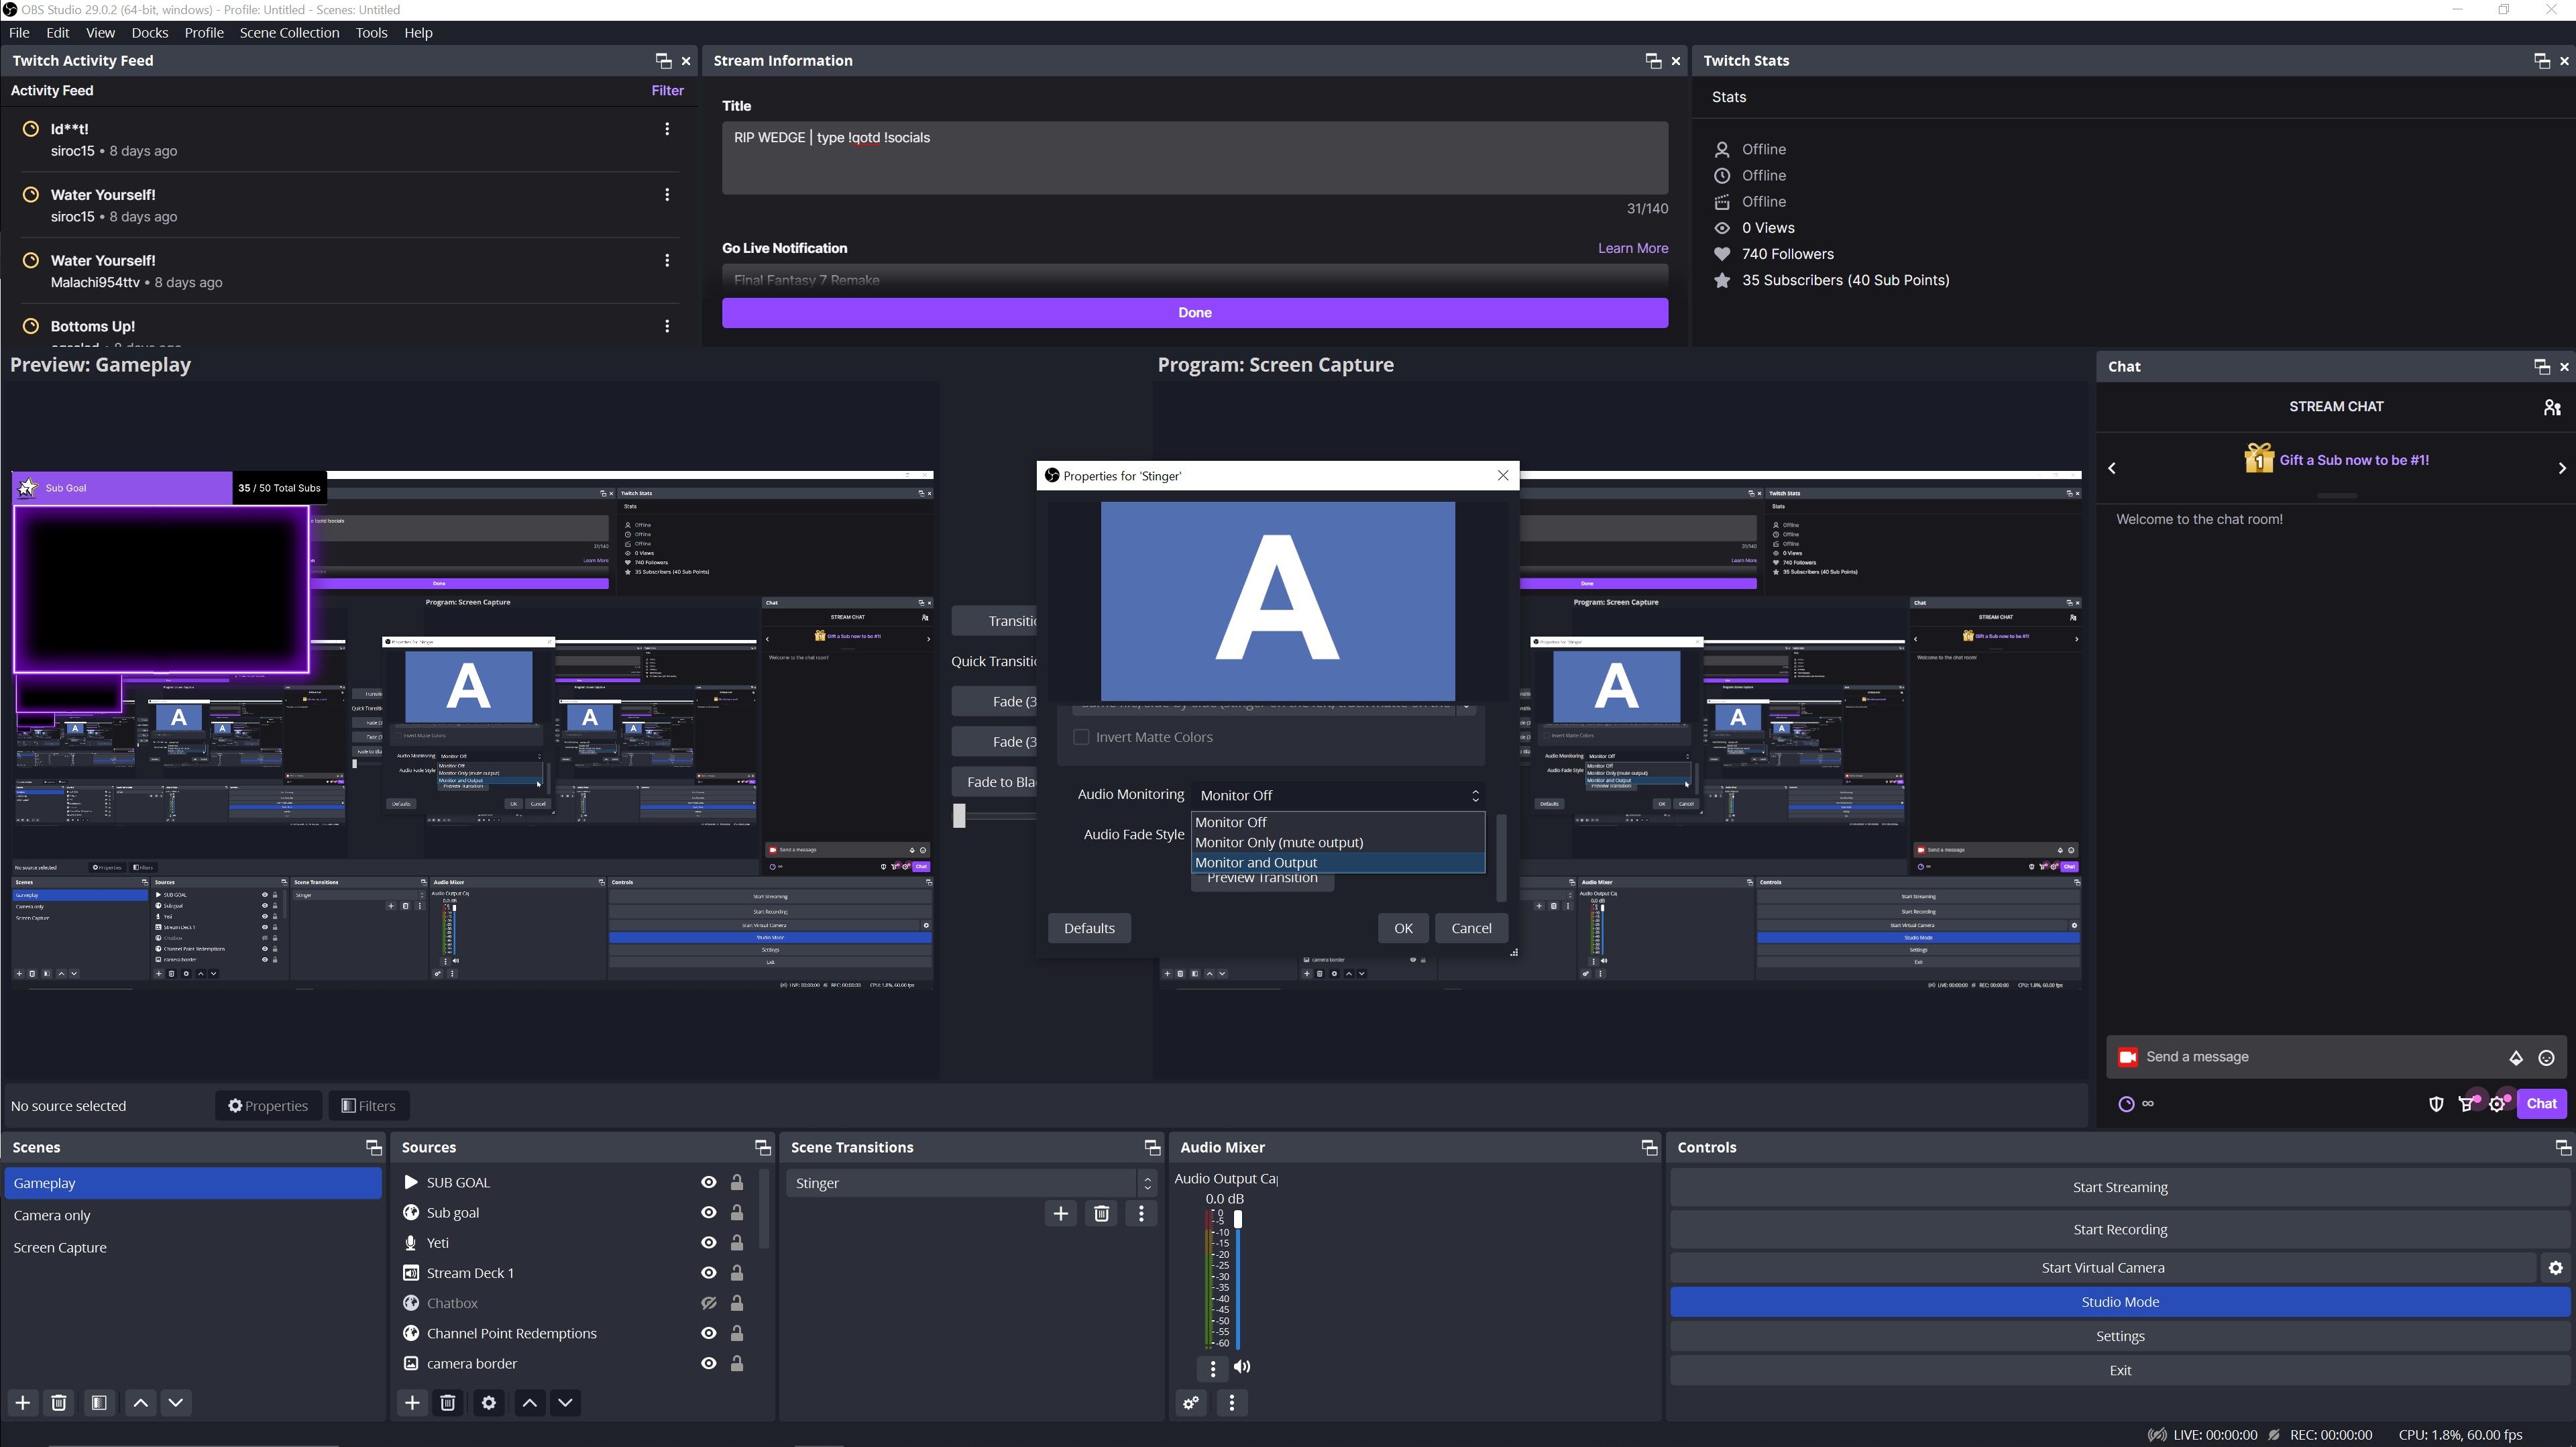
- If your stinger has audio, scroll down and select Monitor and Output from the Audio Monitoring section.
- If you want to demo your transition before saving and applying your changes to make sure it is correct, you can do so by pressing Preview Transition.
- Press OK to confirm your selections.
Setting up a unique stinger will take a little longer than choosing a pre-made transition like a basic fade, especially when it comes to choosing your Transition Point. But don't be afraid to advantage of the Preview Transition button, so you know your transition is perfect before saving and applying your changes.
Where to Find or Make a Stinger for Your Scene Transition
If you want a unique stinger, but you aren’t creatively inclined, you could purchase one from an artist on a website like Etsy or commission one from an artist you like. If you would like to make your own, you can easily do so on Canva.
Canva is a great tool for streamers, and you use it to create almost anything. Using Canva to create your own custom Twitch overlay is extremely simple, so why not create your own custom stinger to match while you’re at it?
If you’re struggling with ideas when it comes to making either an overlay or a stinger, checking out what the top Twitch streamers are using for their streams could help free you from your creative block.
Take Your Stream to the Next Level With Scene Transitions
OBS is definitely a little overwhelming and intimidating to new streamers. But just like anything else, it's all just a matter of learning. Adding a custom scene transition on OBS isn’t as hard as it seems, and hopefully, this guide has helped you out on your scene transition quest.
Adding a scene transition is just one more way to improve your stream, and it is certainly not the last. So feel free to tinker around with OBS as much as you want, and who knows, you might even discover some of the other unique ways you can personalize your stream.
"Scene" - Google News
May 02, 2023 at 01:46AM
https://ift.tt/Q4E27mp
How to Add a Scene Transition to Your Twitch Stream in OBS - MUO - MakeUseOf
"Scene" - Google News
https://ift.tt/ivFZtxP
Shoes Man Tutorial
Pos News Update
Meme Update
Korean Entertainment News
Japan News Update


No comments:
Post a Comment